Featured Posts

A Little Love for Radzen and a Welcome

       Welcome to my Blog on Radzen. Radzen is a tool for developing real world applications for businesses quickly. It is a Rapid...

Friday, March 1, 2019

SSRS Start to Finish in Radzen (Part 1)

  In this article we are going to cover the topic of reporting in Radzen using SQL Server Reporting Services or SSRS for short. We have our environment setup and ready to go at this point or should. If you do not please see my Getting Started post to get up to speed with what is needed.

   The first thing we need to do is build our report. To do this we will use Visual Studio 2017. It could show in your Programs as Visual Studio 2017 (SSDT). This is a standalone version of Visual Studio with the SQL Server Data Tools, the SSDT portion, built in.


Now let's create a new Project. When the New Project window opens we can select a project template. We need to use the Report Server Project under the Business Intelligence category.Give your Project a name and specify a location where to store the report files etc.


Now that we have our Project, let's add a report. On the right hand side in the Solution Explorer you will see a Reports folder, right click that and select Add New Report.


You will be presented with a Wizard to guide you through creating the data source and report.


Now give your data source a name, I called mine Northwind as it will be a connection to the Northwind database on my local SQL Instance.

If you know the connection string details and proper formatting you can type it in. If you do not simply click Edit. I am using a local SQL copy so I am using ".\" as my server. Generally this would be a server name or IP address of your SQL server. Also keep in mind if you have a specific instance name for SQL you will need to include that. Then select the Northwind database as the database to connect to.

An example would be "192.1.1.100\MSSQLSERVER"

Once you have your details filled in make sure to Test the Connection. It will validate you can connect with the credentials and the database is accessible.

Now click OK to close the Test Connection windows, and OK again on the Connection Properties Window. Click Next to move on from that data source. It will now ask us for the query code we want to use to return data for the report. This example will create a New Order form report so let's pull in Order Information from the Orders table. Click Next once you have pasted the query code in.

We are using the following SQL code:

--Retrieve Order Information
SELECT [OrderID]
      ,a.[CustomerID]
  --Pull Actual Company name from joined Customers table
  ,c.CompanyName
  --Pull the First and Last Name together instead of the EmployeeID Number
      ,b.FirstName + ' ' + b.LastName as EmployeeName
      ,[OrderDate]
      ,[RequiredDate]
      ,[ShippedDate]
  -- Get the Shipping company name instead of the ID number
      ,d.CompanyName as ShipVia
      ,[Freight]
      ,[ShipName]
      ,[ShipAddress]
      ,[ShipCity]
      ,[ShipRegion]
      ,[ShipPostalCode]
      ,[ShipCountry]
  FROM [Northwind].[dbo].[Orders] a
  inner join Employees b on a.EmployeeID = b.EmployeeID
  inner join Customers c on a.CustomerID = c.CustomerID
  inner join Shippers d on a.ShipVia = d.ShipperID
  -- Used to only return the single order we want using a parameter called @OrderID.
  where OrderID = @OrderID


On the next screen we will be using the Tabular report style. Click next.

On the Design screen, leave this blank and click next.

Now give your Report a name, I used "New Order". Click Finish. You will be presented with the generated report.

*** TIP - On the toolbar select Report > View > Ruler. This will give you a visible ruler on the page to help size your report items appropriately.

While technically the report could be used now. It isn't laid out well and could use a lot of work to make something you would want to use. Let's start by removing the table and resizing the layout window. Select the table and delete it. Now resize the text box for New Order to less than 8 in. This needs to be done to shrink the page size itself. For the page size select an area of white space below New Order where the table was, this is the page area. You should be able to set the size properties on the right hand side. Once the page is set to 8.5in x 11in you can resize the text box for "New Order" to the full width. You should end up with something like this.


Now we can begin by putting back the data in a more readable format. Let's insert a new table. Right click on that page area > select insert > select table.


Now we do not want to use this like a repeating line grid of data, mainly for row and column alignment so let's delete the "data" row.


You will end up with a basic table. Here you can lay this out as you wish. I added some columns, a section title area, and started dropping in fields. I used the first column as a label where I would type the data label. The second column is for the data itself. You can click the right icon in each field. You should be presented with a list of available columns from the SQL code you entered in the beginning. Continue adding rows or columns and filling in the fields to represent how you would like it to be displayed.


I ended with something like this.


Now click preview and it will build the report and ask you for an Order ID. Enter an ID and click View Report.


Looks a lot better than the original we started with. You can see though that the date fields are also showing times, which are unnecessary. Let's fix that. Right click on the field for order date and select Expression.


Now let's add a function to the existing formula. Currently it is just pulling the data. Let's tell it to only pull the left 10 characters or just the date portion.


Do that for each of the date fields. When you are done preview the changes. Much better.


Now we could be done and publish and the report would work, however I am going to also add in the Order details to this report. To do this right click on datasets and add dataset.


Give the Dataset a name. Choose to use an embedded Dataset and select Northwind from the Datasource dropdown. Add in the following SQL code in the query box. Then click OK.


SELECT [OrderID]
               ,a.[ProductID]
       ,b.ProductName
               ,a.[UnitPrice]
               ,[Quantity]
               ,[Discount]
       ,(a.Quantity * a.UnitPrice) * a.Discount as DiscountAmt
       ,(a.Quantity * a.UnitPrice) - ((a.Quantity * a.UnitPrice) * a.Discount) as ExtendedPrice
  FROM [Northwind].[dbo].[Order Details] a
  inner join Products b on a.ProductID = b.ProductID
  where a.OrderID = @OrderID


Now Add another table like before. This time we will NOT remove that data row. Instead put your data fields there and your column labels in the header section. You should get to something similar to this. (You can add colors and formatting much like Office)


We do need to format the numbers to make them easier to read. to do this we right click our data field and select "Text box Properties"


Now Select the Number section and then the type of formatting the field requires. Unit Price, Discount Amt., and ExtendedPrice should all be currency. Quantity should just be a number. Discount should be a Percentage.


The last addition we are going to do is add the order total. Right click the data row > select insert row > Outside group - below. Now right click that row and add two more rows below it for a total of 3 blank rows.


For the first line we will do a Subtotal. When you select a field now it will automatically SUM number values. This will give us an expression of "=Sum(Fields!ExtendedPrice.Value)"


Next let's add details for Freight. Open the Expression box for the field directly below the SUM of Extended Price you just made. The Expression here is "=Sum(Fields!Freight.Value, "DataSet1")" This gets the value of Freight from the dataset named DataSet1. That is the Order information we setup during the wizard.


Finally on the last line we setup the Order Total. The expression is simple as it's the subtotal expression + the Freight expression or simply "=Sum(Fields!ExtendedPrice.Value) + Sum(Fields!Freight.Value, "DataSet1")" Now you can format these 3 numbers like we did earlier for currency values.

The designer should look like this.


Once you preview it the report should look like this.


That's it!! In Part 2 I will cover deploying the report and validating operation in SSRS before moving on to implementing this report inside Radzen. Stay tuned.

Sunday, February 24, 2019

The first application. A Hello World with Radzen and Northwind.


   Now that we have our Radzen environment setup we can move on to bigger and better things, our first application (If you do not have your Radzen environment setup please see this article, First things First - Getting Started with Radzen). I consider myself a SQL database admin. I do not claim to be the world's best developer or coder. I am a very good business analyst and problem solver. That is what you need to be successful with Radzen, problem solving skills and understanding what the goal is for your application. Before you jump in and begin on your own custom app it's a good idea to become familiar with the Radzen environment, how it works, and the capabilities it offers. That being said, Radzen needs a database in which to work from so without taking the time to create one from scratch, we can use one provided by Microsoft. We can download a copy of that database script here at this link. This is from the Github repo from the Radzen team.


  • The Northwind database has been used for years in application samples, training materials, and 3rd party use cases.  
  • Several Radzen examples they provide on their github repo use the Northwind database. 
  • You can become familiar with the database, browse through real code, and create some of your own all in one shot.


Let's get started. Now that we have the database script file downloaded, open the folder where you downloaded it to.

   Extract or UnZip the Northwind.zip file. You should end up with a Northwind.sql file.

Now double click the file. It may ask you how you would like to open the file. You should be able to select SSMS or SQL Server Management Studio.

   Once the file is open you can simply click Execute. This will create your Database and all of the sample data.


Now we have our database ready we can open Radzen and create a new application. 

Now fill out the application details.

  1. Make sure to use the Empty application setting as we do not want a sample application built for us. 
  2. Choose a name for your application, I chose "FunTimes".
  3. Now set a location to store the data on your computer.
  4. Keep Angular selected for the Framework type
  5. Check the box to enable server-side code (.Net Core) and leave the rest of the defaults.
  6. Click Create


Now we need to attach the Northwind database that we created earlier. To do that select Data on the top of our application window.


Now select New on the data sources window.


Fill out the form for the data source.

  1. Select MS SQL Server as the source
  2. Give your Connection a name
  3. Fill out the server name or IP address (Make sure to use the instance name in SQL if you specified one other than default such as "ServerNameOrIP \ InstanceName"
  4. Specify Northwind as the database
  5. For authentication you can use Windows or SQL depending on what you have enabled on your server. I am using Windows authentication so I do not need to specify a username or password as it will use my current user credentials. 
  6. If you use SQL Authentication specify a user account and password.
  7. Click the Infer Schema Button


You will see one more dialog. We want to check the box to Generate pages for CRUD operations. Then click Finish. Now click the X in the top right corner to close the data source setting window.


We have now generated a Radzen application from a database. You can Click Run at the top to test it out. Give it a few seconds to compile and start the web services for the first time.


Thursday, February 21, 2019

First things First - Getting Started with Radzen


    So before you can begin your first application it's a good idea to have your environment, that is all the software you need, installed and configured. This post will help walk you through the basic items, and a few optional ones you need so you can begin your first project.

  Software Needed 

  • Radzen (Obviously) -  Download -
  • Microsoft SQL Server - You can use the free version of SQL Express here
  • SQL Server Reporting Services - This is now seperate from the SQL install. Download here.
  • SSMS for SQL Server 2017 - This is used to manage your SQL databases. Download here.
  • SSDT for VS2017 - This is what you use to create and publish SSRS reports. Download here.
  • Visual Studio Code (optional) - This is a great quick editor for your code but you can use                   Visual Studio Express or Community if you prefer. Download here.

   Installation Guides

   I'm a big advocate of reusing code and not re-inventing the wheel, much like how RAD development helps us not have to code every little thing in our applications. To that end I will post links to already relevant articles for the installation of the software you need.

  • Radzen -  Installation Instructions here
  • Installing SQL Server Express 2017 - Great article from mssqltips.com by Daniel Farina. If you are new to databases or need help this site can be a great resource. Link
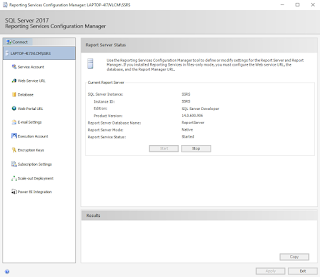
  • Installing SSRS - This is only a few clicks to actual install it. See this link for Microsoft's guide. Once it is installed you do need to run  "Reporting Services Configuration Manager" There are a few things to do here - First launch and connect to your SSRS instance.
             Next select Database on the left hand side.

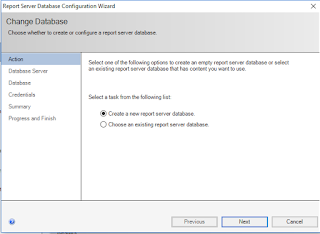
                Next Choose Change Database to setup the Report Server database.
         

               Now we get a wizard to walk us through setting up the database. Keep the first option selected and select next.

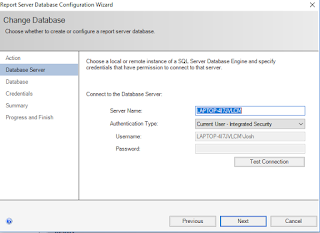
               Enter your server information from setting up your SQL instance. If you added your local windows account or domain user and are using that account here for install you can continue on, otherwise use a SQL account. If you decide to use a SQL account I would recommend not using SA and instead creating a specific SSRS specific account to use. 

              You can keep the default database name and click next.


                For credentials you can again move forward if using Windows otherwise enter the SQL account information.

               Now review the Summary and complete the task. It should only take a few moments and your database will be configured and ready to go.

                The database is done and now we need to setup the Web Service URL and site. Select the "Web Service URL" on the left and you can leave the defaults. Simply click the Apply button at the bottom and give it a few seconds to complete.


                We need to do the same for the "Web Portal URL" Click on it and click apply at the bottom. 

                  Now you should be able to start the SSRS Services and you are done. Navigate to the top level on the left and you can click start to start the services.

  • Installing SSMS - This is the tool you use to create your databases, table views, triggers and everything else database related. This link from C-SharpCorner.com is a nice walkthrough by Vignesh Mani will walk you through the process of getting it installed. Note: On step 2 of the article it shows version 17.8.1 which was current as of the writing. Currently 17.9.1 is the most recent version - Direct link to the download here.
  • Installing SSDT - This software is where you create reports for SSRS and the tool you use to publish those to the report server. The software installs in a few clicks and there isn't much to this one. Here is the link to the installer of the standalone version of the installer. You can install support directly during installation of visual studio as well if you are installing it from scratch. 

In a future article I will cover setting up TFS support for Visual Studio as the means to provide code backup, versioning. branching etc. for all of your Radzen needs.